
3 first steps to help you create the best dolls
This article is part of doll making series created specially for my "Doll making classes". Introduction to get you going and encourage you to create an art doll!
There are a lot of imperceptible steps in the doll making process. Some of them are pretty simple, like finding the right materials, but others could take an extremely long time. Nevertheless, this invisible work is just as much important as your dolls face-up or detailed costume. Today I'm gonna talk about creative process between an abstract idea and finished technical drawing. Those are very first steps of the doll making which will determine how your finished piece will look like. This system is a blend of many hours reading about doll making, analyzing all kinds of dolls and creating my own techniques. I've been using this method for years for my own dolls. I hope it'll help you in your creative journey!

START WITH AN IDEA
I tend to start with an abstract idea or single inspirational image in my mind. Coming up with a concept is a process too. Usually, a finished look won't pop into your head momentarily. You have to think things through, imagine all the shapes, details, textures, colours... So now it's time to get your ideas into shape, ask yourself these questions and make choices.
What is the doll's story?
Deliberate your idea even further, think about your doll as a character. How does appearance reveal its persona? What details help to tell a story? At this step I usually think about the distinctive features: hair, costume, pose, colour palette and catchy details which would encourage the viewer to find out more.

What type of doll is this?
If you're making different types of dolls, decide which kind this one will be. Ball jointed doll, ribbon jointed doll or maybe a plush doll? What posture would show us emotion the best? At this point, you have to determine more technical details too. Does your doll has a stand? What size would be most suitable? Deciding on these questions now will save you a lot of time in the creative doll making process. You don't want to find yourself debating on the doll size, when you already started sculpting, trust me!
How to realize your idea?
This stage is a most crucial and will determine how good your doll will turn out. You already know what type the doll will be and how it'll look like, but what about the construction? In this case, I like to make some technical sketches and figure out the frame and jointed points. I establish possible ways to attach doll to the stand and hairs to the scalp. If you feel uncertain about some techniques your doll will require, now is the time to read about them! I feel like this step is so important that I subdivided it into two more separate sections below.
PROPORTIONS, ANATOMY, AND SKETCHING
Whether you're making a stylised figure or accurate human sculpture it's important to know the basics of human anatomy. I guess you have to know the rules to break them, right? Exact human proportions somehow never looked right in the doll body for me. I developed a style of dolls having long legs and unnaturally long torso. This lengthy figure is also very thin and delicate. There's no way a human body could look like this, but that's what I love about the dolls: they look so similar to us yet having some impossible and inhuman features.

Source: Pinterest
Let your imaginations run wild. You can create an even cartoony type of doll with a huge head and tiny body and it'll look cute. Really lengthy, tall and thin figure could have a melancholic aura. Try to sketch some different proportions to see which will compliment your doll.

Source: pmucks.deviantart.com
But there are some anatomy rules you must follow despite the doll style you choose. For example symmetry of the face. Unless your idea is a surreal figure or an abstraction, you can't put one eye on the forehead and the other one on the chin. I know it's an extreme example, but my point is that anatomy knowledge helps you sculpt even crazy variations of the human body.
FRAME AND MECHANICS
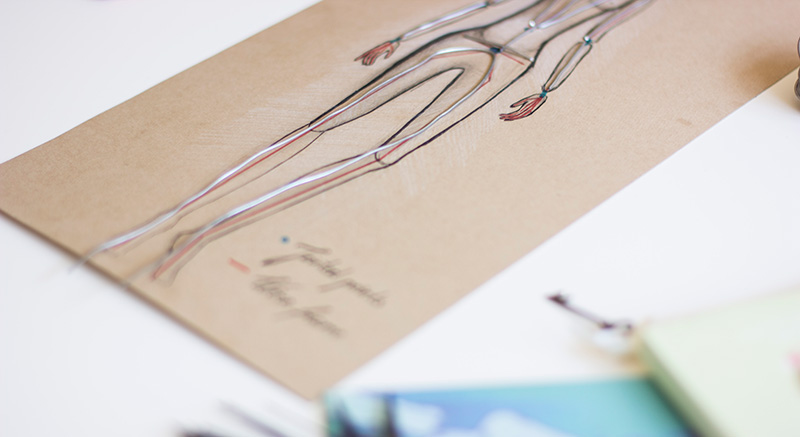
Designing is basically a problem-solving process. You wonder what surface should you start sculpting your doll? Or maybe you worry how sturdy the doll will be? The solution is a strong base. In my case the frame. All of my dolls have a wire frame inside the body to keep everything in place. This method won't work with ball jointed dolls, though. The wire frame is that one extra step to better dolls. It keeps them stronger and your sculpting process easier. When you have your finished sketch try to imagine where the frame will be and mark it on your drawing. Consider that being bones of your doll.
The other important part of this stage is to determine if you'd like to be able to move your dolls hands, legs or head. If so, mark the jointed points on your sketch and find out how the mechanics will work. I like to use three jointing techniques: beads, ribbon, and soft leather (although these joints must be hidden under the clothing).
If you're just starting out in doll making and it's hard to keep up with all this information, I have you covered! I have prepared a free doll blueprint for you. Download it below!
BLUEPRINT OF THE DOLL + FREE PRINTABLE
Your final sketch with marked frame and joints is your guide during the sculpting process. Always keep it near and check your sculpture proportions occasionally. This will prevent undesirable mistakes and will keep you on track with the original idea. I've prepared a free printable which can shorten a sketching process for you. Feel free to ask questions regarding this topic in the comment section, I'm always happy to help!
Instructions:
The doll in the blueprint is 32cm (~12,6") tall
It doesn't fit in one A4 size page, so you need to print out both files (landscape layout) and tape them together
You can change the doll size in the blueprint with photo editing software

If you're interested in doll making and want to learn more, I have some good news for you. I'm working on doll making online courses. From the first steps of sculpting to the costume making. Photos, videos, and step by step guides to help you create an art doll! The courses will be available at the end of June. Follow me on social media or subscribe to my newsletter and don't miss out the launch day! There will be three courses available: sculpting, painting and costume making. So you could enroll in just one or choose the whole bundle. I'm starting a closed Facebook group too, where I'll be answering your questions and helping through your process every day. I hope to see you there, happy doll making!
If you want to learn more about doll making and create your own doll using the same techniques I use, check out my Doll making classes!